Did you know that you can shoot and...
04
11
Did you know that you can shoot and edit videos with PowerPoint? Let's use the hidden name function "Screen recording"
Reduce overtime! Office techniques
Let's use PowerPoint's famous hidden feature "Screen Recording"Have you ever used "Screenshot" to take a picture of the screen in front of you? Then, how about shooting a "movie" to be used for operation explanations? There is an image that a dedicated application is required, but in fact it is possible to shoot with "PowerPoint". Use PowerPoint's hidden name function [Video Record]. It's in the Recordings tab, which you don't usually click on.
This function is available in the latest PowerPoint 2021, PowerPoint 2019/2016/2013, and Microsoft 365. You can record the specified range as a video and insert it into the slide as it is, and after inserting it, you can change the size of the video and trim unnecessary parts. It can also be saved as an MP4 format file.
The range to be recorded as a video can be specified arbitrarily, and a wide range of usage scenarios can be considered, such as creating videos of operating instructions for in-house systems and as a tool for recording video conferences. The operation itself is easy, so let's start using it right away.
*The contents of this article have been confirmed to work with "Office Professional Plus 2021".
Unlike recording a slideshow, you can shoot any area of your desktop
The [Screen recording] function is separate from the [Recording] function that records slideshows. Record the specified "arbitrary range" as a movie as it is. The following is a video recording of the operation of registering a web page to [Favorites].
[Example of desktop video shot with “PowerPoint”] We recorded the operation of registering a web page to [Favorites]. It is convenient to be able to complete with "PowerPoint"When starting recording, first open the window you want to record. Click Screen Recording in the Autoplay Media group on the Recording tab to display the recording dock, where you can specify the recording area, and set whether to record audio or capture the mouse pointer. can start recording. You can respecify the range any number of times before recording starts. Also, the recording will be inserted into the slide as is, so select a new slide.
The dock is minimized after recording starts, and I'm a little confused about how to stop it. You can stop it with [Win] + [Shift] + [Q], but you can also click the icon in the lower right of the dock to pin it so that you can press the [Stop] button.
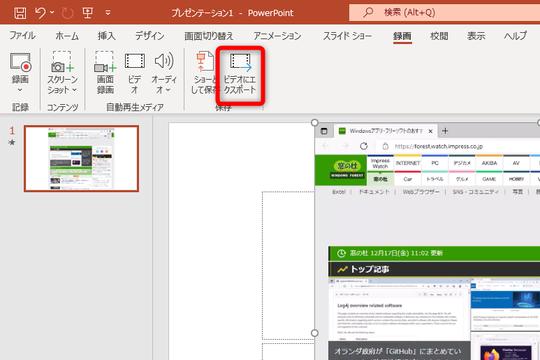
Click Screen Recording in the Autoplay Media group on the Recording tab. You can also click [Screen Recording] in the [Media] group on the [Insert] tab. [Audio] is a button for recording, and [Pointer recording] is a button for whether or not to show the mouse pointer. Display the window you want to record in advance. Click [Select Area] to specify the area you want to record. Click [Record] to start recording after the countdown Here, we recorded the operation of adding a web page to [Favorites]. To stop recording, press [Win] + [Shift] + [Q] The recorded video is automatically inserted into the slide. You can adjust the size with the handles at the four cornersEditing the recorded video
Cut out only the necessary parts
The video automatically inserted into the slide can be played as is. If you're embedding a video as an element of a slide, simply resize it with the four corner handles. If an extra range is reflected, it is possible to cut it out with "Trimming" in the same way as a still image.
By selecting the inserted video and clicking [Trimming] on the [Video format] tab, you can trim only the necessary parts.Remove the front and back of the video
It is also possible to shorten the duration by removing the preliminary time at the start of shooting and the interval at the end. Use the Trim Video function to remove unwanted parts before and after. Right-click the video and select Trim.
Right-click the video and select Trim Use the green and red sliders in the Trim Video dialog box to remove unwanted parts before and afterExport as MP4 format video file
It is also possible to export in MP4 format as a general video file. It is versatile as it can be used in other applications as well. However, the audio is mono, and the size depends on the specified recording range.
Right-click the video and select [Save Media As] The saved file can be used in other appsExport the results of trimming and deleting unnecessary parts as a video file
If you export the video file using the method described above, it will remain as it was shot, and the results of deleting unnecessary parts of the video and trimming the front and back of the video will not be reflected. To avoid this, use the Export to Video feature.
Select your video. Click [Export to Video] on the [Recording] tab to display the [Export] screen. Click [Create Video][Export] is a function to export slides as a video file. If you don't need a margin around the video, check the display size of the video, adjust the size of the slide, and operate after removing the margin.
Generally speaking, cropping and trimming the captured video requires special software, but if it can be completed with PowerPoint, it would be easy to get started. Please, try it.
Buy on Amazon:
![[Kill personally developed games] Top class in app history! Too beautiful water puzzle "a [Q] ua" | Famitsu App for smartphone game information](https://website-google-hk.oss-cn-hongkong.aliyuncs.com/drawing/article_results_7/2022/3/3/66755df992ff2d2b1e1ab43844ef9f88_0.jpeg "[Kill personally developed games] Top class in app history! Too beautiful water puzzle \"a [Q] ua\" | Famitsu App for smartphone game information")


 | Autonomous Driving Lab")
-Yahoo! Journalism")

![[Latest in 2021] 10 recommended seat covers for cars!If you want to improve the texture and functionality of the car, choose the mounting type and material.](https://website-google-hk.oss-cn-hongkong.aliyuncs.com/drawing/article_results_7/2022/3/3/e5b44589e77141f3a633189165fb6f60_0.jpeg "[Latest in 2021] 10 recommended seat covers for cars!If you want to improve the texture and functionality of the car, choose the mounting type and material.")